
![]()
savonliquide is a package that contains a set of
functions that helps you deal with accessibility issues in R, RMarkdown
and Shiny.
You can install the stable version of savonliquide from
CRAN with:
install.packages("savonliquide")or you can install the development version from Github
with:
remotes::install_github("feddelegrand7/savonliquide")check_contrast() and check_contrast_raw()check_contrast() allows you to generate a report from
the Contrast
Checker API. The report will display a contrast ratio among other
useful information that will judge the accessibility level of your color
contrast.
The following plot is awful in terms of color contrast. The two main
colors used are : #FDF6E3 (for points) and
#C6F6E3" for the background.
library(ggplot2)
#> Warning: package 'ggplot2' was built under R version 4.0.3

ggplot(mpg, aes(hwy, cty)) +
  geom_point(color = "#FDF6E3") +
  theme(panel.background = element_rect(fill = "#C6F6E3"))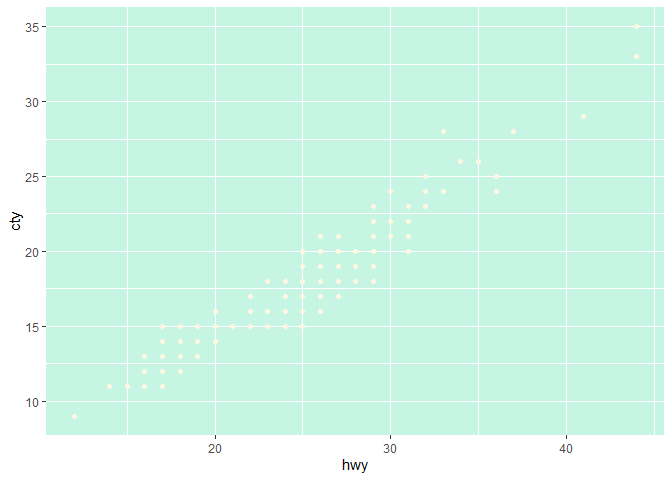
Let’s check the contrast:
library(savonliquide)
# fg_col stands for foreground color
# bg_col stands for background color


check_contrast(fg_col = "#FDF6E3",
               bg_col = "#C6F6E3")
#>
#> * The Contrast Ratio is 1.10
#>
#> * The result for the AA check is : FAIL
#>
#> * The result for the AALarge check is : FAIL
#>
#> * The result for the AAA check is : FAIL
#>
#> * The result for the AAALarge check is : FAIL
You can see that the report indicates that we’ve a very low Contrast Ratio and that we’ve failed all the recommended standards (In the web development industry we consider mostly the AA standard).
Now let’s experiment other colors combinations. Let’s go for:
Foreground color: #0000FF
Background color: #FFFFFF
check_contrast(fg_col = "#0000FF",
               bg_col = "#FFFFFF")
#>
#> * The Contrast Ratio is 8.59
#>
#> * The result for the AA check is : PASS
#>
#> * The result for the AALarge check is : PASS
#>
#> * The result for the AAA check is : PASS
#>
#> * The result for the AAALarge check is : PASS
Awesome ! we’ve got an excellent Contrast Ratio and we’ve passed all the accessibility standards. Let’s use the above colors to render our plot again:
ggplot(mpg, aes(hwy, cty)) +
  geom_point(color = "#0000FF") +
  theme(panel.background = element_rect(fill = "#FFFFFF"))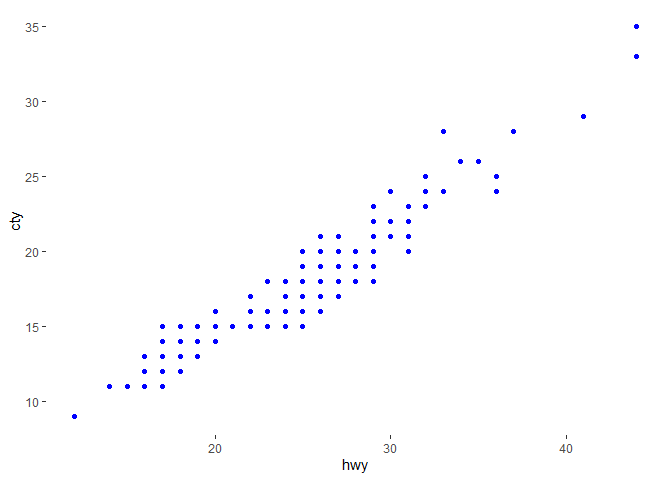
The check_contrast_raw() function allows you to get the
same information but in a raw format. To be more precise, you get a
list object.
check_contrast_raw(fg_col = "#0000FF", bg_col = "#FFFFFF")
#> $ratio
#> [1] "8.59"
#>
#> $AA
#> [1] "pass"
#>
#> $AALarge
#> [1] "pass"
#>
#> $AAA
#> [1] "pass"
#>
#> $AAALarge
#> [1] "pass"paste0("This is a good Contrast Ratio ",
check_contrast_raw(fg_col = "#0000FF", bg_col = "#FFFFFF")$ratio)
#> [1] "This is a good Contrast Ratio 8.59"add_description()The add_description() function works in RMarkdown
documents (HTML output) and Shiny application. It creates an HTML
element that will be used to describe another element. When a
screen-reader user focuses on the former, he will hear the vocal
description provided by the latter. Let’s dig into an example in Shiny.
Note that in order to experiment the following example, you must install
and enable a screen reader of your choice (I’m using the Chrome Vox
Google Chrome extension).
library(savonliquide)
library(shiny)
library(magrittr)

ui <- fluidPage(

     h2("Using a screen reader
         hit Tab and Shift + Tab to
         navigate between the buttons
         and stop at button 2 to see the difference"),

     actionButton(
       inputId = "inp1",
       label = "button 1"
     ),
     actionButton(
       inputId = "inp2",
       label = "button 2"
     ) %>%
       add_description(
         description = "hello this is a button
                    when you click it you'll have a
                    thing, when you don't click it you'll
                    have another thing",
         descID = "descriptor" # the ID of the element that will be created and used as a descriptor
       )
   )

server <- function(input, output, session) {}

shinyApp(ui, server)
By default the description will be invisible for non screen-reader
users but you can set it to be visible by setting the parameter
visible to TRUE.
describe_using()describe_using() relies on a
preexisting HTML element to describe another element.
Note that you can use many elements to describe one.
library(savonliquide)
library(shiny)
library(magrittr)

ui <- fluidPage(

   h2("Using a screen reader
         hit Tab and Shift + Tab to
         navigate between the buttons
         and stop at button 2 to see the difference"),

   div(
      id = "paragraph1",
      p("The following paragraph tag will be used as the first descriptor")
   ),

   div(
      id = "paragraph2",
      p("The following paragraph tag will be used as the second descriptor")
   ),

   actionButton(
      inputId = "inp1",
      label = "button 1"
   ),
   actionButton(
      inputId = "inp2",
      label = "button 2"
   ) %>%
      describe_using(
         descID = c("paragraph1", "paragraph2")
      )
)

server <- function(input, output, session) {}

shinyApp(ui, server)create_invisible_anchor()This functions allows you to create an invisible HTML anchor tag that will be heard only by screen-reader users. The anchor will be used to redirect them to a particular web page that could be more adapted to their condition.
library(savonliquide)
library(shiny)
library(magrittr)

ui <- fluidPage(

   h2("Using a screen reader
         hit <Tab> or <Shift + Tab> to
         navigate until you discover the invisible anchor tag"),

   actionButton(
      inputId = "inp1",
      label = "button 1"
   ),
   actionButton(
      inputId = "inp2",
      label = "button 2"
   ),

   create_invisible_anchor(
      id = "invisible-anchor",
      text = "Hit ENTER if you want to be redirected to google.com",
      href = "https://google.com"
   )
)

server <- function(input, output, session) {}

shinyApp(ui, server)make_skiplinks()Often, in heavy website or application, you might want a screen-reader user to have the choice to skip superfluous HTML elements and go directly to the main-content. In such situation, you might consider skiplinks! just try out with the following example:
library(savonliquide)
library(shiny)
library(magrittr)

ui <- fluidPage(

   h2("Using a screen reader
       hit <Tab> or <Shift + Tab> to
       navigate until you get asked
       if you want to skip to the main content"),

   a("do you want to be redirected to the main content ?",
          id = "skiplink") %>%
      make_skiplinks(
         skip_to = "#main-content", # note that we need to append '#' to the ID
         bg_color = "red",
         col = "white"
      ),

   actionButton(
      inputId = "inp1",
      label = "button 1"
   ),
   actionButton(
      inputId = "inp2",
      label = "button 2"
   ),

   div(
      id = "main-content",
      h1("The main content starts here")
   )

)

server <- function(input, output, session) {}

shinyApp(ui, server)make_tabbable()Some HTML elements (for example buttons or
anchors) get focusable by default when you hit
library(savonliquide)
library(shiny)
library(magrittr)

ui <- fluidPage(

   h2("Using a screen reader
       hit <Tab> or <Shift + Tab> to
       navigate and see which element is tabbable or not"),

   actionButton(
      inputId = "inp1",
      label = "button 1"
   ),

   p("This is the first paragraph"),


   actionButton(
      inputId = "inp2",
      label = "button 2"
   ),

   p("This is the second paragraph")

)

server <- function(input, output, session) {}

shinyApp(ui, server)
When you navigate the application, you can see that only the buttons
get focusable when you hit the
library(savonliquide)
library(shiny)
library(magrittr)

ui <- fluidPage(

   h2("Using a screen reader
       hit <Tab> or <Shift + Tab> to
       navigate and see which element is tabbable or not") %>%
      make_tabable(tab_index = 0),

   actionButton(
      inputId = "inp1",
      label = "button 1"
   ) %>%
      make_tabable(tab_index = -1) # a negative value will make it untabbable
   ,

   p("This is the first paragraph") %>%
      make_tabable(tab_index = 0),


   actionButton(
      inputId = "inp2",
      label = "button 2"
   ) %>%
      make_tabable(tab_index = -1),

   p("This is the second paragraph") %>%
      make_tabable(tab_index = 0)

)

server <- function(input, output, session) {}

shinyApp(ui, server)Please note that the savonliquide project is released with a Contributor Code of Conduct. By contributing to this project, you agree to abide by its terms.