CHAPTER
|
Other document structures |
|
It is perfectly possible to write whole documents using nothing but section headings and paragraphs. As mentioned in section 3.5, novels, for example, usually consist just of chapters divided into paragraphs. However, it's more common to need other features as well, especially if the document is technical in nature or complex in structure.
It's worth pointing out that ‘technical’ doesn't necessarily mean ‘computer technical’ or ‘engineering technical’: it just means it contains a lot of τηχνε (tekne), the specialist material or artistry of its field. A literary analysis such as La Textualisation de Madame Bovary (on the marginal notes in the manuscripts of Flaubert's novel) is every bit as technical in the literary or linguistic field as the maintenance manual for the Airbus 380 is in the aircraft engineering field.
This chapter covers the most common features needed in writing structured documents: lists, tables, figures (including images), sidebars like boxes and panels, and verbatim text (computer program listings). In Chapter 7 we will cover footnotes, cross-references, citations, and other textual tools.
 6.1 A little think about structure
It's very easy to sit down at a keyboard with a traditional wordprocessor and just start typing. If it's a very short document, or something transient or relatively unimportant, then you just want to type it in and make it look ‘right’ by highlighting with the mouse and clicking on font styles and sizes.
In doing so, you may achieve the effect you wanted, but your actions have left no trace behind of why you made these changes. This is usually unimportant for trivial or short-term documents, but if you write longer or more complex documents, or if you often write documents to a regular pattern, then making them consistent by manual methods becomes a nightmare. LATEX's facilities for automation are based on you providing this ‘why’ information.
If your documents have any of the features below, then you have probably already started thinking about structure.
-
The document naturally divides into sections (parts, chapters, etc.).
-
The document is long.
-
There is lots of repetitive formatting in the document.
-
The document is complex (intellectually or visually).
-
There are lots of figures or tables (or examples, exercises, panels, sidebars, etc.).
-
Accuracy is important in formatting the document.
-
A master copy is needed for future reference or reprinting.
-
This is a formal or official document needing special care and attention.
-
It's my thesis, book, leaflet, pamphlet, paper, article, etc. That's why I care.
-
The document (or part of it) may need ongoing or occasional re-editing and republishing.
If you've got that far, you're over half-way done. Using a structural editor — even a simple outliner — can make a huge difference to the quality of your thinking because you are consciously organising your thoughts before setting them down. And it can make just as big a difference to your formatting as well: more consistent, better presented, easier for the reader to navigate through, and more likely to be read and understood — which is presumably why you are writing the document in the first place.
6.2 Lists
Lists are useful tools for arranging thoughts in a digestible format, usually a small piece of information at a time. There are four basic types of list, shown in Table 6.1.
|
|
|
|
There are actually two other types, segmented lists and reference lists, but these are much rarer, and outside the scope of this document.
The structure of lists in LATEX is identical for each type, but with a different environment name. Lists are another example of this LATEX technique (environments), where a pair of matched commands surrounds some text which needs special treatment.
Within a list environment, list items are always
identified by the command \item (followed by
an item label in [square brackets] in the case of labelled
lists). You don't type the bullet or the number or the
formatting, it's all automated.
6.2.1 Itemized lists
To create an itemized list, use the the itemize environment:
\begin{itemize}

\item Itemized lists usually have a bullet;

\item Long items use `hanging indentation',
whereby the text is wrapped with a margin
which brings it clear of the bullet used in
the first line of each item;

\item The bullet can be changed for any other
symbol, for example from the \textsf{bbding}
or \textsf{pifont} package.

\end{itemize}
The default list bullet is round and solid1 (舦) which is also available with the
command \textbullet if you load the
textcomp package. See section 9.6.1 for details of how to change the
settings for list item bullets.
6.2.2 Enumerated lists
To create an enumerated list, use the enumerate environment:
\begin{enumerate}

\item Enumerated lists use numbering on each
item (can also be letters or roman numerals);

\item Long items use `hanging indentation'
just the same as for itemized lists;

\item The numbering system can be changed for
any level.

\end{enumerate}
Enumerated lists use numbering on each item (can also be letters or roman numerals);
Long items use ‘hanging indentation’, just the same as for itemized lists;
The numbering system can be changed for any level.
See section 6.2.6 for details of how to change the numbering schemes for each level.
In standard LATEX document classes, the vertical spacing between items, and above and below the lists as a whole, is more than between paragraphs. If you want tightly-packed lists, use the mdwlist package, which provides ‘starred’ versions (itemize*, enumerate*, etc).
6.2.3 Description lists
To create a description list, use the description environment:
\begin{description}

\item[Identification:] description lists
require a topic for each item given in
square brackets;

\item[Hanging indentation:] Long items use
this in the same way as all other lists;

\item[Reformatting:] Long topics can be
reprogrammed to fold onto multiple lines.

\end{description}
- Identification:
description lists require a topic for each item given in square brackets;
- Hanging indentation:
Long items use this in the same way as all other lists;
- Reformatting:
Long topics can be reprogrammed to fold onto multiple lines.
All three of these types of lists can have multiple paragraphs per item: just type the additional paragraphs in the normal way, with a blank line between each. So long as they are still contained within the enclosing environment, they will automatically be indented to follow underneath their item.
6.2.4 Inline lists
Inline lists are a special case as they require the use of the paralist package which provides the inparaenum environment (with an optional formatting specification in square brackets):
\usepackage{paralist}
...
\textbf{\itshape Inline lists}, which are
sequential in nature, just like enumerated
lists, but are \begin{inparaenum}[\itshape
a\upshape)]\item formatted within their
paragraph; \item usually labelled with
letters; and \item usually have the final
item prefixed with `and' or
`or'\end{inparaenum}, like this example.
Inline lists, which are sequential in nature, just like enumerated lists, but are a) formatted within their paragraph; b) usually labelled with letters; and c) usually have the final item prefixed with ‘and’ or ‘or’, like this example.
See Chapter 8 for details of the font-changing commands used in the optional argument to inparaenum.
Exercise 15. List practice
Add some lists to your document. Pick any two of the ones described here to practice with.
If you successfully installed paralist in the example ‘Install a package’ in section 5.2.2 then you can use inline lists as described in section 6.2.4.
6.2.5 Reference lists and segmented lists
Reference lists are visually indistinguishable from
numbered or lettered lists, but the numbering or lettering
does not imply a sequence. The numbers
or letters are just used as labels so that the items can be
referred to from elsewhere in the text (as in ‘see
item 501(c)3’). In this sense they are really a
kind of sub-sectional division, and LATEX's
\paragraph or
\subparagraph commands (with appropriate
renumbering) would probably be a far better solution than
using a list. Label them and refer to them with
\label and \ref as for
any other cross-reference (see section 7.4).
Segmented lists are a highly specialised structure and outside the scope of this document. For details of their usage, see the the chapter ‘Segmentation and Alignment’ in Guidelines for the Text Encoding Initiative.
6.2.6 Lists within lists
You can start a new list environment within the item of an existing list, so you can embed one list inside another up to four deep. The lists can be of any type, so you can have a description list containing an item in which there is a numbered sub-list, within which there is an item containing a bulleted sub-sub-list.
-
by default an outer enumerated list is numbered in Arabic numerals;
-
an embedded enumerated list is lettered in lowercase;
-
a third level is numbered in lowercase Roman numerals;
-
the fourth level uses uppercase alphabetic letters.
-
-
-
Multiple embedded lists automatically change the bullet or numbering scheme so that the levels don't get confused, and the spacing between levels is adjusted to become fractionally tighter for more deeply nested levels.
These are only defaults and can easily be changed by redefining the relevant set of values. You could also add a fifth and further levels, although I suspect that would mean your document structure needed some careful analysis, as lists embedded five deep will probably confuse your readers.
The values for lists come in pairs: for each level there is a counter to count the items and a command to produce the label:2
| Level | Default | Counter | Label command |
|---|---|---|---|
| 1 | digit. | enumi | \theenumi |
| 2 | (letter) | enumii | \theenumii |
| 3 | roman. | enumiii | \theenumiii |
| 4 | LETTER. | enumiv | \theenumiv |
Note that each counter and command ends with the Roman numeral value of its level (this is to overcome the rule that LATEX commands can only be made of letters — digits wouldn't work here). To change the format of a numbered list item counter, just renew the meaning of its label:
\renewcommand{\theenumi}{\Alph{enumi}}
\renewcommand{\theenumii}{\roman{enumii}}
\renewcommand{\theenumiii}{\arabic{enumiii}}
This would make the outermost list use uppercase letters, the second level use lowercase roman, and the third level use ordinary Arabic numerals. The fourth level would remain unaffected.
Extend your use of lists by nesting one type inside a different one.
Lists: a caution to the unwary
Treat lists with care: people sometimes use tables for labelled information which is really a list and would be better handled as such. They often do this because their wordprocessor has no way to do what they want (usually to place the item label level with the description or explanation) except by using a table, hence they are misled into believing that their text is really a table when it's actually not.
- In fact, any time you define a counter in LATEX,
you automatically get a command to reproduce its value.
So if you defined a new counter example to use in a teaching
book, by saying
\newcounter{example}, that automatically makes available the command\theexamplefor use when you want to display the current value of example.
6.3 Tables
Tabular typesetting is the most complex and time-consuming of all textual features to get right. This holds true whether you are typing in plain-text form, using a wordprocessor, using LATEX, using HTML or XML, using a DTP system, or some other text-handling package. Fortunately, LATEX provides a table model with a mixture of defaults and configurability to let it produce very high quality tables with a minimum of effort.
LATEX, in common with standard typesetting practice, uses the word ‘Table’ to mean a formal textual feature, numbered and with a caption, referred to from the text (as in ‘See Table 5’). Sometimes you can get ‘informal’ tables, which simply occur between two paragraphs, without caption or number.
The arrangement of information in rows and columns within either of these structures is called a ‘tabulation’ or ‘tabular matter’.
It is important to keep this distinction firmly in mind for this section.
6.3.1 Floats
Tables and Figures are what printers refer to as ‘floats’. This means they are not part of the normal stream of text, but separate entities, positioned in a part of the page to themselves (top, middle, bottom, left, right, or wherever the designer specifies). They always have a caption describing them and they are always numbered so they can be referred to from elsewhere in the text.
LATEX automatically floats Tables and Figures, depending on how much space is left on the page at the point that they are processed. If there is not enough room on the current page, the float is moved to the top of the next page. This can be changed by moving the Table or Figure definition to an earlier or later point in the text, or by adjusting some of the parameters which control automatic floating.
Authors sometimes have many floats occurring in rapid succession, which raises the problem of how they are supposed to fit on the page and still leave room for text. In this case, LATEX stacks them all up and prints them together if possible, or leaves them to the end of the chapter in protest. The skill is to space them out within your text so that they intrude neither on the thread of your argument or discussion, nor on the visual balance of the typeset pages. But this is a skill few authors have, and it's one point at which professional typographic advice or manual intervention may be needed.
There is a float package which lets you create new classes of floating object (perhaps Examples or Exercises).
6.3.2 Formal tables
To create a LATEX Table, use the table
environment containing a \caption command
where you type the caption, and a \label
command to give the Table a label by which you can refer to
it.
\begin{table}
\caption{Project expenditure to year-end 2006}
\label{ye2006exp}
...
\end{table}
Numbering is automatic, but the \label
command must follow the
\caption command, not precede it. The
numbering automatically includes the chapter number in
document classes where this is appropriate (but this can of
course be overridden). The \caption
command has an optional argument to provide a short caption
if the full caption would be too long for the List of Tables:
\caption[Something short]{Some very long caption that
will only look reasonable in the full figure.}
6.3.3 Tabular matter
Within a Table, you can either typeset the tabular matter using LATEX, or include a table captured as an image from elsewhere. We will see how to include images in section 6.4 on Figures, where they are more common.
To typeset tabular matter, use the
tabular environment. The
\begin{tabular} command must be followed
by a compulsory second argument in curly braces giving the
alignment of the columns. These are specified for each
column using one of single letters l,
c, and r for
left-aligned, centered, or right-aligned text, or the letter
p followed by a width argument if you
want a long entry to wrap to several lines (a miniature
paragraph as a single cell on each row).
TEX's original tabular settings were designed
for classical numerical tabulations, where each cell
contains a single value. The p
specification allows a cell to be a miniature paragraph set
to a specific width. These are p column
specifications are not multi-row
entries, they are single cells which contain multiple lines
of typesetting: the distinction is very important.
Auto-adjusting space between columns is possible with the
tabularx package, but the
auto-resizing column widths used in web pages are not
available in LATEX.
The array package provides for many other typographic variations such as left-aligned, right-aligned, and centred multi-line columns, and other packages provide decimal-aligned columns, row-spanning and column-spanning, multi-page, and rotated (landscape format) tables.
| Item | € Amount | |
|---|---|---|
| a) | Salaries (2 research assistants) | 28,000 |
| Conference fees and travel expenses | 14,228 | |
| Computer equipment (5 workstations) | 17,493 | |
| Software | 3,562 | |
| b) | Rent, light, heat, etc. | 1,500 |
| Total | 64,783 |
The Institute also contributes to (a) and (b).
As an example, a tabular setting with three columns, the
first one centered, the second left-aligned, and the third
one right-aligned, would therefore be specified as
{clr}, as in the example below. Note the
use of indentation to make the elements of the table clear
for editing, and note also how the typeset formatting is
unaffected by this (see Table 6.1).
\begin{table}
  \caption{Project expenditure to year-end 2006}
  \label{ye2006exp}
  \begin{center}
    \begin{tabular}{clr}
      &Item&\EUR\ Amount\\
    \hline
      a)&Salaries (2 research assistants)&28,000\\
      &Conference fees and travel expenses&14,228\\
      &Computer equipment (5 workstations)&17,493\\
      &Software&3,562\\
      b)&Rent, light, heat, etc.&1,500\\\cline{3-3}
      &Total&64,783
    \end{tabular}
    \par\medskip\footnotesize
The Institute also contributes to (a) and (b).
  \end{center}
\end{table}
You do not need to format the tabular data in your editor: LATEX does this for you when it typesets the table, using the column specifications you provided. Extra space is automatically added between columns, and can be adjusted by changing the \tabcolsep dimension. Takaaki Ota provides an excellent Tables mode for Emacs which provides a spreadsheet-like interface and can generate LATEX table source code (see Figure 6.1).
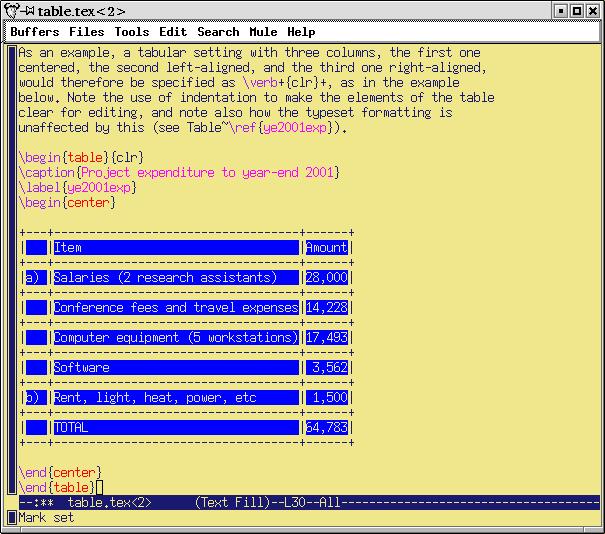
It is conventional to centre the tabular setting within
the Table, using the center environment
(note US spelling) or the \centering
command. The entries for each cell are separated by an
ampersand character (&) and the end
of a row is marked by
the double-backslash (\\).
The \hline command draws a rule across
all columns and the \cline command draws a
rule across a range of columns (here, under column three
only — the argument needs a range). If used, these commands follow
the
\\ of the row they apply to. There are
some extra formatting commands after the tabular material in
the example. These are explained in
Chapter 8.
If there is no data for a cell, just don't type
anything — but you still need the
& separating it from the next
column's data. The astute reader will already have
deduced that for a table of
n columns, there must always be
n−1 ampersands in each row. The exception to
this is when the \multicolumn command is
used to create cells which span multiple columns. There is
also a package (multirow) to enable
cells to span multiple rows, but both of these techniques
are outside the scope of this document.
6.3.4 Tabular techniques for alignment
As mentioned earlier, it's also perfectly possible to typeset tabular matter outside a formal Table, where you want to lay out an informal tabulation between paragraphs where a fully floating formal Table would be unnecessary (these are usually quite short: there are several of them in this document).
Tabular mode can also be used wherever you need to align material side by side, such as in designing letterheads, where you may want your company logo and address on one side and some other information on the other.
By default, LATEX typesets
tabular environments inline to the
surrounding text, so if you want your alignment displayed by
itself, put it inside a positioning environment like
center,
flushright, or
flushleft, or leave a blank line or
\par before and after so it gets typeset
separately.
There is much more to tabular setting:
full details are in the manuals mentioned in
the last paragraph in the Foreword. One final note to remind you of the
automated crossreferencing features: because the example
table is labelled, it can be referenced from anywhere in the
document as Table 6.1 just by using
\ref{ye2006exp}, regardless of how much
the surrounding document or structure is moved or
edited.
Create one of the following in your document:
a formal Table with a caption showing the number of people in your class broken down by age and sex;
an informal tabulation showing the price for three products;
the logo
(hint: section 6.7.2)
6.4 Figures
As explained in section 6.3.1, Figures and Tables float to a vacant part of the page, as they are not part of the sequence of sentences making up your text, but illustrative objects that you refer to.
Figures can contain text, diagrams, pictures, or any other kind of illustration. To create a figure, use the figure environment: like Tables, they automatically get numbered, and must include a caption (with a label after the caption, if needed, exactly the same as for Tables)
\begin{figure}
\caption{Total variable overhead variance (after
         \citeauthor[p.191]{bull}}
\label{workeff}
\begin{center}
\includegraphics[width=.75\columnwidth]{diagram}
\end{center}
\end{figure}
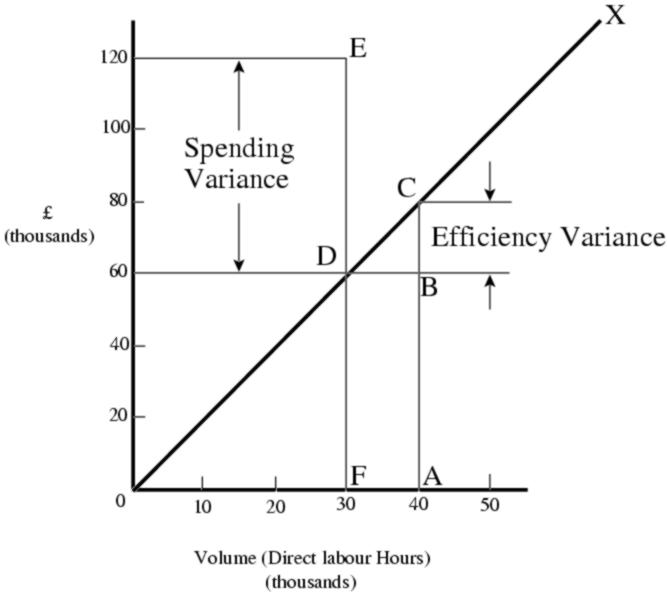
You can see that the structure is very similar to the
table environment, but in this case we
have a graphic included. Details of this command
(\includegraphics) are in the next section.
Details of the bibliographic citation mechanism are in section 7.4.2
The content of the Figure could of course also be textual, in the form of a list or a text diagram. LATEX has a simple drawing environment called picture, which lets you create a limited set of lines and curves, but for a diagram of any complexity, you should use a standard vector drawing program (see section 6.5.1).
6.5 Images
Images (graphics) can be included anywhere in a LATEX
document, although in most cases of formal documents they will
occur in Figures (see preceding section). To use graphics, you
need to use the graphicx package in
your preamble:
\usepackage{graphicx}3
This enables the command
\includegraphics which is used to insert an
image in the document. The command is followed by the name of
your graphics file without the filetype,
for example: \includegraphics{myhouse}
(we'll see in a minute why you don't include the
filetype).
In most cases you should just make sure the image file is in the same folder (directory) as the document you use it in. This avoids a lot of messing around remembering where you put the files. If you have images you want to use in several different documents in different places on your disk, there is a way to tell LATEX where to look (see section 6.5.2).
For standard LATEX with dvips, graphics files must be in Encapsulated PostScript (EPS) format: this has been the publishing industry standard for portable graphics for many years, and no other format will work portably in standard LATEX.4
All good graphics packages can save images as EPS, but be very careful because some packages, especially on Microsoft Windows platforms, use a very poor quality driver, which creates very poor quality EPS files. If in doubt, check with an expert. If you find an EPS graphic doesn't print, the chances are it's been badly made by the graphics software. Download Adobe's own PostScript driver from their Web site instead.
For pdfLATEX, graphics files
can be in Portable Network
Graphic (PNG), Joint Photographic
Experts Group (JPG), or PDF
format, not EPS. This means if you want to use both
standard LATEX as well
as pdfLATEX, you need to keep
your graphics in two formats, EPS
and one of the others. This is why you don't include the
filetype in the filename you give with
\includegraphics: LATEX will assume
EPS and
pdfLATEX will look for JPG, PNG or
PDF files matching the name.
The \includegraphics command can take
optional arguments within square brackets before the filename
to specify either the height or width, and the other dimension
will automatically change to scale. If you specify both, the
image will be distorted to fit. You can scale an image by a
factor instead of specifying height or width; clip it to
specified coordinates; and rotate it in either direction.
Multiple optional arguments are separated with commas.
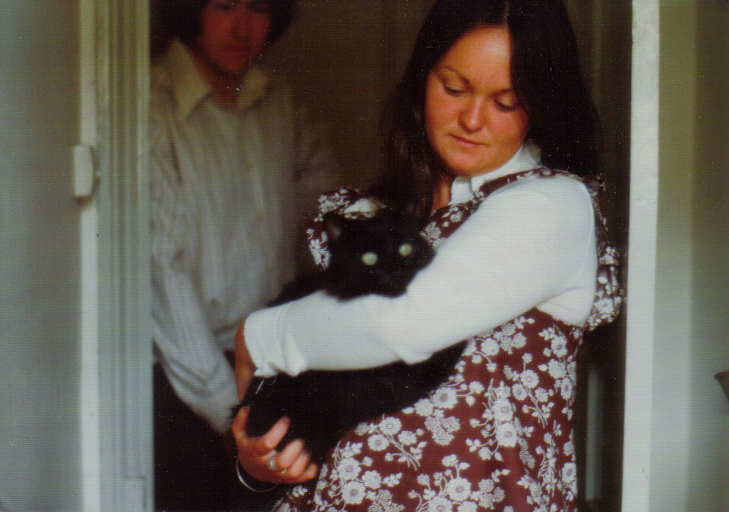
\begin{center}
\includegraphics[width=3cm]{twithcat}
\end{center}
For details of all the arguments, see the documentation on
the graphicx package or a copy of the
The LATEX Companion. This package also
includes commands to  ,
,
![\scalebox{-1}[1]{mirror}](mirror.png) , and
, and
![\scalebox{2}[1]{scale}](scale.png) text.
text.
It is in fact possible to tell LATEX to generate the right file format by itself, but this requires an external command-line graphics converter, and as it gets done afresh each time, it slows things down rather a lot.
EPS files, especially bitmaps,
can be very large indeed, because they are stored in ASCII format.
Staszek Wawrykiewicz has drawn my attention to a useful MS-DOS program to
overcome this, called cep
(‘Compressed Encapsulated Postscript’) available
from CTAN in the
support/pstools directory, which can
compress EPS files to a fraction of
their original size. The original file can be replaced by the
new smaller version and still used directly with
\includegraphics.
- Some distributions of TEX systems allow other formats to be used, such as PNG, Microsoft Bitmap (BMP) files, Hewlett-Packard's Printer Control Language (PCL) files, and others; but you cannot send such documents to other LATEX users and expect them to work if they don't have the same distribution installed as you have. Stick to EPS.
6.5.1 Making images
There are two types of image: bitmaps and vectors.
- Bitmaps
Bitmap images are made of coloured dots, so if you enlarge them, they go jagged at the edges, and if you shrink them, they go blurry. Bitmaps are fine for photographs, where every dot is a different colour, and no-one will notice if you don't shrink or enlarge too much. Bitmaps for diagrams and drawings, however, are almost always the wrong choice, and often disastrously bad.
- Vectors
Vector drawings are made from instructions (eg ‘draw this from here to here, using a line this thick’). They can be enlarged or shrunk as much as you like, and never lose accuracy, because they get redrawn automatically at any size. You can't do photographs as vectors, but it's the only acceptable method for drawings or diagrams.
Vector graphic packages are also better suited for saving your image directly in EPS or PDF format (both of which use vectors internally). All the major graphics-generating packages in all disciplines output vector formats: AutoCAD, ChemDraw, MathCAD, Maple, Mathematica, ArcInfo, and so on. EPS is the universally-accepted format for creating vector graphics for publication, with PDF a close second. Most of the major graphics (drawing) packages can also save as EPS, such as PhotoShop, PaintShop Pro, Adobe Illustrator, Corel Draw, and GIMP. There are also some free vector plotting and diagramming packages available like tkPaint and GNUplot which do the same. Never, ever (except in the direst necessity) save any diagram as a bitmap.
Bitmap formats like JPG and PNG are ideal for photographs, as they are also able to compress the data substantially without too much loss of quality. However, compressed formats are bad for screenshots, if you are documenting computer tasks, because too much compression makes them blurry. The popular Graphics Interchange Format (GIF) is good for screenshots, but is not supported by TEX: use PNG instead, with the compression turned down to minimum. Avoid uncompressible formats like BMP as they produce enormous and unmanageable files. The Tagged Image File Format (TIFF), popular with graphic designers, should also be avoided because far too many companies have designed and implemented non-standard, conflicting, proprietary extensions to the format, making it virtually useless for transfer between different types of computers (except in faxes, where it's still used in a much stricter version).
Add
\usepackage{graphicx}to the preamble of your document, and copy or download an image you want to include. Make sure it is a JPG, PNG, or PDF image if you use pdfLATEX, or an EPS image if you use standard LATEX.Add
\includegraphicsand the filename in curly braces (without the filetype), and process the document and preview or print it.Make it into a figure following the example in section 6.4.
Be aware that some DVI previewers are not able to display all types of graphics, and some cannot display colour. For best results, use PDF or PostScript preview.
6.5.2 Graphics storage
I mentioned earlier that there was a way to tell
LATEX where to look if you had stored images centrally
for use in many different documents. The answer is in a
command \graphicspath which you supply
with an argument giving the name of an additional directory
path you want searched when a file uses the
\includegraphics command, for
example:
\graphicspath{c:\mypict~1\camera}
\graphicspath{/var/lib/images}
\graphicspath{HardDisk:Documents:Reports:Pictures}
I've used the ‘safe’
(MS-DOS) form of the Windows My
Pictures folder because it's A Bad Idea to
use directory names containing spaces (see the panel ‘Picking suitable filenames’ in chapter 4). Using
\graphicspath does make your file less
portable, though, because file paths tend to be specific
both to an operating system and to your computer, like the
examples above.
6.6 Verbatim text
If you are documenting computer procedures, you probably need fixed-width type for examples of programming or data input or output. Even if you are writing about completely non-computer topics, you may often want to quote a URI or email address which needs to be typeset specially. It is particularly important in these two examples to avoid hyphenating them if they have to break over a line-end, because the hyphen might be taken by the user as a part of the address.
Standard LATEX includes two features for handling fixed-format text, and there are many more available in packages.
6.6.1 Inline verbatim
To specify a word or phrase as verbatim text in
typewriter type within a sentence, use the special command
\verb, followed by your piece of text
surrounded by any suitable character which does
not occur in the text itself. This is a
very rare exception to the rule that arguments go in curly
braces. I often use the plus sign for this, for example to
show a LATEX command, I type
\verb+\includegraphics[width=3in]{myhouse}+
in order to display
\includegraphics[width=3in]{myhouse}, but
sometimes I use the
grave accent (backtick or open-quote) or the
vertical bar when the phrase already has a plus sign in it,
like \verb|\(y=a+2x^2\)| when
illustrating the LATEX equation
\(y=a+x^2\).
This command has the advantage that it turns off all
special characters (see section 2.5) except
the one you use as the delimiter, so you can easily quote
sequences of characters in any computer syntax without
problems. However, LATEX will never break the argument of
\verb at a line-end when formatting a
paragraph, even if it contains spaces, so if it happens to
be long, and falls towards the end of a line, it will stick
out into the margin. See section 2.8.2 for more
information on line-ends and hyphenation.
The url package avoids this by
providing the command \url which works in
the same way as \verb, with the argument
enclosed in a pair of characters, but performs a hyphenless
break at punctuation characters, as in http://www.ucc.ie:8080/cocoon/cc/.
It was designed for Web URIs,5 so it understands their syntax and will never
break mid-way through an unpunctuated word, only at slashes
and full points. Bear in mind, however, that spaces are
forbidden in URIs, so using spaces
in
docs/siteowner.xml\url arguments will fail, as will using
other non-URI-valid
characters.
- The original term Uniform Resource Locator (URL) is now strongly deprecated in the Web community in favour of the more accurate Uniform Resource Indicator (URI). For details see http://www.w3.org/Addressing/. Unfortunately the older term still persists, especially in LATEX and XML markup.
6.6.2 Display verbatim
For longer (multiline) chunks of fixed-format text, use the verbatim environment:
\begin{verbatim}
\documentclass[11pt,a4paper,oneside]{report}
\begin{document}

\title{Practical Typesetting}
\author{Peter Flynn\\Silmaril Consultants}
\date{December 2004}
\maketitle

\end{document}
\end{verbatim}
Like \verb, this turns off all special
characters, so you can include anything at all in the
verbatim text except the exact line
\end{verbatim}
For more control over formatting, however, I recommend the use of the fancyvrb package, which provides a Verbatim environment (note the capital letter) which lets you draw a rule round the verbatim text, change the font size, and even have typographic effects inside the Verbatim environment. It can also be used in conjunction with the fancybox package (see section 6.7.3), and it can add reference line numbers (useful for chunks of data or programming), and it can even include entire external files.
Add your email address and home page URI using the
\verband\urlcommands. You'll need to\usepackage{url}for the latter.If you know some programming, try a few lines enclosed in verbatim and Verbatim environments.
6.7 Boxes, sidebars, and panels
LATEX, like most typesetting systems, works by setting text into boxes. The default box is the width of the current page, and works like an old compositor's galley (tray) from the days of metal type: it accumulates typeset text until it's a bit longer than the specified page height. At this stage LATEX works out how much of it really will fit on a page, snips it off and ships it out to the DVI or PDF file, and puts the rest back into the galley to accumulate towards the following page.
6.7.1 Boxes of text
Because of this ‘box’ model, LATEX can typeset any text into a box of any width wherever on the page you need it.
The simplest command for small amounts of text is
\parbox. This command needs two arguments
in curly braces: the first is the width you want the text
set to, and the second is the text itself, for
example:
\parbox{1in}{Please make sure you send in your
             completed forms by January 1st
             next year, or the penalty clause
             2(a) will apply}
Please make sure you send in your completed forms by January 1st next year, or the penalty clause 2(a) will apply
The text is typeset to the required width, and the box
is extended downwards for as long as is required to fit the
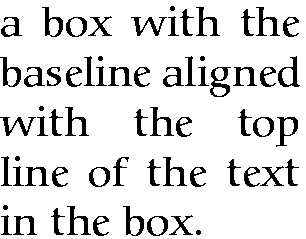
text. Note that the baseline of a \parbox
is set to the midpoint of the box; that is, if you include a
\parbox in mid-sentence, the centre of the
box will be lined up with the line of type currently being
set.![]() You can specify that it should be the top or
bottom by adding an optional t or
b in square brackets before the width. For
example,
You can specify that it should be the top or
bottom by adding an optional t or
b in square brackets before the width. For
example,
\parbox[t]{1in}{...} will produce
Notice that when setting very narrow measures with type
that is too large, the spacing may become uneven and there
may be too much hyphenation. Either use
\raggedright or reduce the type size, or
(in extreme cases) reword the text or break each line by
hand. It is rare for LATEX to need this: the example above
was deliberately chosen to be obtuse as an
illustration.
Where the contents is more extensive or more complicated, you can use the minipage environment.
Within this you can use virtually everything
that occurs in normal text (e.g. lists, paragraphs,
tabulations, etc.) with the exception of floats like
tables and figures. The minipage
environment has an argument just like
\parbox does, and it means the same: the
width you want the text set to.
Note that in minipages and
\parboxes, the paragraph indentation
(\parindent) is
reset to zero. If you need to change it, set it inside the
minipage or \parbox
using the \setlength command (see section 3.6).
\begin{minipage}{3in}
Please make sure you send in your completed
forms by January 1st next year, or the
penalty clause 2(a) will apply.
\begin{itemize}
\item Incomplete forms will be returned to
you unprocessed.
\item Forms must be accompanied by the
correct fee.
\item There is no appeal. The adjudicators'
decision is final.
\end{itemize}
\end{minipage}
Please make sure you send in your completed forms by January 1st next year, or the penalty clause 2(a) will apply.
Incomplete forms will be returned to you unprocessed.
Forms must be accompanied by the correct fee.
There is no appeal. The adjudicators' decision is final.
There are two other ways of typesetting text to widths
other than the normal text width: you can use a one-row,
one-cell tabular environment with the
p column type specification, or you
can use the \vbox command, which is raw
TEX, and outside the scope of this document.
6.7.2 Framed boxes
To put a frame round  , use the
\fbox command:
\fbox{some text}. This works for a few
words in mid-line, but the framed box and its contents
won't break over the end of a line. To typeset
multiline text in a box, put it in a
\parbox, or use a
minipage or
tabular environment as described above,
and enclose the whole thing in a
\fbox.
\fbox{\begin{minipage}{3in}
This multiline text is more flexible than
a tabular setting:
\begin{itemize}
\item it can contain any type of normal
LATEX typesetting;
\item it can be any specified width;
\item it can even have its own
footnotes\footnote{Like this}.
\end{itemize}
\end{minipage}}
This multiline text is more flexible than a tabular setting:
it can contain any type of normal LATEX typesetting;
it can be any specified width;
it can even have its own footnotes.6
The spacing between text and box is controlled by the value of \fboxsep, and the thickness of the line by \fboxrule. The following values were used above:
\setlength{\fboxsep}{1em}
\setlength{\fboxrule}{2pt}
As we saw before, setting justified text in narrow
measures will produce poor spacing: either use the
\raggedright command, or change the font
size, or add explicit extra hyphenation points.
Note the \begin{tabular} and
\begin{minipage} commands still need the
width specifying: in the case of the
\begin{tabular} by the use of the
p column type with its width
specification, and in the case of
\begin{minipage} by the second
argument.
\fbox{\begin{tabular}{p{1in}}
Multiline text in a box typeset using
\textsf{tabular}
\end{tabular}}
Multiline text in a box typeset using tabular
6.7.3 Sidebars and panels
The fancybox package lets you
extend the principle of \fbox with
commands to surround text in square, oval (round-cornered),
and drop-shadow boxes (e.g. \ovalbox,
\shadowbox, etc.: see the documentation
for details).
You can create panels of any size with these borders by using the minipage environment to typeset the text inside a special Sbox environment which fancybox defines. The minipage formats the text but the Sbox ‘captures’ it, allowing you to put the frame round it as it prints.
The printed version of this document uses this extensively and there is a useful example shown in section 9.5.


